    /// <summary>
    /// Calculates the lenght in bytes of an object
    /// and returns the size
    /// </summary>
    /// <param name="TestObject"></param>
    /// <returns></returns>
    private int GetObjectSize(object TestObject)
    {
        BinaryFormatter bf = new BinaryFormatter();
        MemoryStream ms = new MemoryStream();
        byte[] Array;
        bf.Serialize(ms, TestObject);
        Array = ms.ToArray();
        return Array.Length;
}25 Aralık 2015 Cuma
Nesne büyüklüğü öğrenme
18 Aralık 2015 Cuma
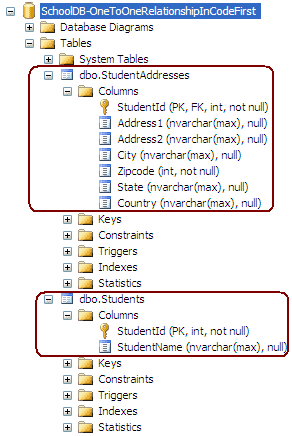
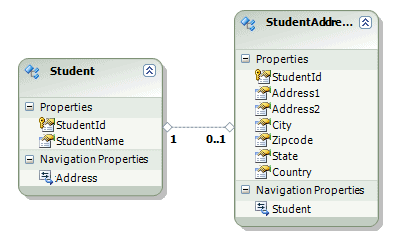
Entity Framework one-to-zero or one relationship
Configure One-to-One Relationship:
We are going to configure a One-to-One relationship between Student and StudentAddress. As you may know, a one-to-one relationship happens when the primary key of one table becomes PK & FK in another table. Here, StudentId is a Primary key of Student table so StudentId should be PK and FK in StudentAddress table in order to have one-to-one (actually one-to-zero or one) relationship between them.Note that a one-to-one relationship is technically not possible in MS SQL Server. It will always be one-to-zero or one.
Visit Entity Relationship section to understand how EF manages one-to-one, one-to-many, and many-to-many relationships.
Configure one-to-zero or one relationship using DataAnnotations:
The following example shows one-to-one relationship is configured using DataAnnotations attributes.public class Student { public Student() { } public int StudentId { get; set; } public string StudentName { get; set; } public virtual StudentAddress StudentAddress { get; set; } } public class StudentAddress { [Key, ForeignKey("Student")] public int StudentId { get; set; } public string Address1 { get; set; } public string Address2 { get; set; } public string City { get; set; } public int Zipcode { get; set; } public string State { get; set; } public string Country { get; set; } public virtual Student Student { get; set; } }As you can see in the above Student and StudentAddress class, we haven't done anything special in Student class because it follows the code first conventions, so StudentId will become PK. Now, we have used the Key and ForeignKey attributes for StudentId property in StudentAddress class, in order to mark it as PK as well as FK. Notice that we have specified Student entity in the ForeignKey attribute. Thus, Code-First will create a one-to-one relationship between Student and StudentAddress using DataAnnotations attributes.
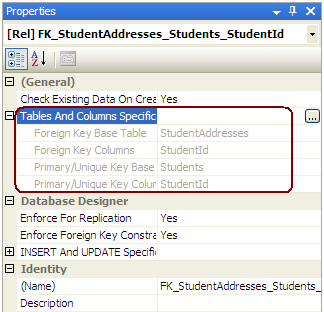
Configure One-to-Zero-or-One relationship using Fluent API:
The following example sets one-to-zero or one relationship between Student and StudentAddress using Fluent API.protected override void OnModelCreating(DbModelBuilder modelBuilder) { // Configure StudentId as PK for StudentAddress modelBuilder.Entity<StudentAddress>() .HasKey(e => e.StudentId); // Configure StudentId as FK for StudentAddress modelBuilder.Entity<Student>() .HasOptional(s => s.StudentAddress) // Mark StudentAddress is optional for Student .WithRequired(ad => ad.Student); // Create inverse relationship }As you can see in the above example, we set primary key to StudentId for StudentAddress because it doesn't follow the Code-First conventions for PK. In the second line, HasOptional method makes StudentAddress property nullable and then WithRequired method creates inverse relationship by making StudentId column as FK in StudentAddress table. Thus, StudentId will be PK and FK in StudentAddress which makes one-to-zero or one relationship.
Alternatively, you can also configure StudentAddress entity, as shown below.
protected override void OnModelCreating(DbModelBuilder modelBuilder)
{
    // Configure StudentId as PK for StudentAddress
    modelBuilder.Entity<StudentAddress>()
        .HasKey(e => e.StudentId);

    // Configure StudentId as FK for StudentAddress
    modelBuilder.Entity<StudentAddress>()
                .HasRequired(ad => ad.Student)
                .WithOptional(s => s.StudentAddress);

}
So, DataAnnotations and Fluent API example for one-to-zero or one relationship will create the following database:
15 Aralık 2015 Salı
string tarihi DateTime a çevirme
string dateText = "21/12/2015";
var date = DateTime.ParseExact(dateText , "dd/MM/yyyy", null);
var date = DateTime.ParseExact(dateText , "dd/MM/yyyy", null);
14 Aralık 2015 Pazartesi
Tüm paketleri güncelleme
Updating All Packages
Issue: 431There is currently no easy way to update all packages within a solution. In this iteration, we’ll update the Update-Package command to support updating all packages at the solution level and project level. We will not be adding support for this to the Add Package Dialog in this iteration, but will consider it for a future iteration. We just need to think through the UI for that.
| Command | Description |
|---|---|
Update-Package |
Updates all packages in all projects. |
Update-Package –Project ProjectName |
Updates all packages in the specified project |
Update-Package PackageId |
Breaking Change: Updates the specified package in all projects rather than just the current project |
Update-Package PackageKid –Project ProjectName |
No change: Updates the specified package in the specfied project only as before. |
Update-Package –Safe |
New –Safe flag only updates packages to the next “safe” version, which is the latest version with the same major and minor version number as the current package. |
13 Aralık 2015 Pazar
DB’deki tüm tablolardaki kayıt sayısı ve index boyutunu hesaplamak
Database deki tüm kayıtları tablo bazında ve diskte ne kadar yer kapladığınız sorgulamak için kullanılacak bir script.
Script çalıştırıldığında aşağıda görüldüğü üzere tablo bazında satır
sayısı ve diskte ne kadar yer kapladığı görüntülenebilmektedir.
SET nocount ONCREATE TABLE #spaceused (name NVARCHAR(120) , rows CHAR(11) , reserved VARCHAR(18) , data VARCHAR(18) , index_size VARCHAR(18) , unused VARCHAR(18))DECLARE Tables CURSORFORSELECT sys.schemas.name + '.' + sys.objects.name FROM sys.objects INNER JOIN sys.schemas ON sys.objects.schema_id = sys.schemas.schema_id WHERE sys.objects.type = 'U'OPEN TablesDECLARE @table VARCHAR(128)FETCH NEXT FROM Tables INTO @tableWHILE @@FETCH_STATUS = 0 BEGIN INSERT INTO #spaceused EXEC sp_spaceused @table FETCH NEXT FROM Tables INTO @table ENDCLOSE TablesDEALLOCATE TablesSELECT *FROM #spaceusedORDER BY CAST([rows] AS BIGINT) DESCDROP TABLE #spaceusedEXEC sp_spaceused |
10 Aralık 2015 Perşembe
4 Aralık 2015 Cuma
EntityFramework savechanges olmadan önce bir önceki değeri alma
db.Users.Attach(user);
var current = db.Entry(user).CurrentValues.Clone();
db.Entry(user).Reload();
//Do you user(from db) stuff
db.Entry(user).CurrentValues.SetValues(current);
db.Entry(user).State = EntityState.Modified;
db.SaveChanges();28 Kasım 2015 Cumartesi
26 Kasım 2015 Perşembe
SQL Server üzerinde Stored Procedure Kullanimi
Merhaba Arkadaslar,
Bu makalemizde SQL Server üzerinde Stored Procedure yazimini inceleyecegiz.
Stored Procedure’ler database server üzerinde saklanan SQL cümlecikleridir. Parametreler alabilirler ve size sonuçlar döndürebilirler. Avantajlari arasinda DB server üzerinde olmasindan dolayi daha hizli çalismalari, sadece ilk çalismalarinda derlenmeleri sonraki çalismalarda derlenmemeleri (bu da neden hizli oldugunu açikliyor) SQL cümlecikleri ve programlama dilleri ile yazdigimiz kodlari birbirinden ayristirmamizi saglamasi sayilabilir.
Mesela MUSTERI tablosundaki tüm kayitlari getiren sadece ID degeri verilen MUSTERI kaydini getiren ve istenilen müsteri kaydinin silinmesini saglayan Stored Procedure leri sirayla yazalim.
Peki bu Stored Procedure nasil çalistiracagiz. Bunu da EXEC komutu ile yapariz
komutunun sonuç kümesi asagidaki gibidir

Kullanimi asagidaki gibidir.

Kullanimi asagidaki gibidir.
Baska bir makalede görüsmek üzere….
http://www.yazilimmutfagi.com/10257/veritabani/sql-server/sql-server-uzerinde-stored-procedure-kullanimi.aspx
Bu makalemizde SQL Server üzerinde Stored Procedure yazimini inceleyecegiz.
Stored Procedure’ler database server üzerinde saklanan SQL cümlecikleridir. Parametreler alabilirler ve size sonuçlar döndürebilirler. Avantajlari arasinda DB server üzerinde olmasindan dolayi daha hizli çalismalari, sadece ilk çalismalarinda derlenmeleri sonraki çalismalarda derlenmemeleri (bu da neden hizli oldugunu açikliyor) SQL cümlecikleri ve programlama dilleri ile yazdigimiz kodlari birbirinden ayristirmamizi saglamasi sayilabilir.
Mesela MUSTERI tablosundaki tüm kayitlari getiren sadece ID degeri verilen MUSTERI kaydini getiren ve istenilen müsteri kaydinin silinmesini saglayan Stored Procedure leri sirayla yazalim.
1-Tüm müsteri kayitlarini döndüren Stored Procedure
CREATE PROCEDURE Musteri_ReadAllASBEGIN SET NOCOUNT ON; SELECT * from MUSTERIENDGO |
EXEC dbo.Musteri_ReadAll |
2-Sadece ID si verilen bir müsteri kaydini getiren Stored Procedure
CREATE PROCEDURE Musteri_ReadById@Id int --parametreASBEGIN SET NOCOUNT ON; SELECT * from MUSTERI WHERE Id = @IdEND |
DECLARE @Id intSET @Id = 2EXEC dbo.Musteri_ReadById @Id |
3- Istenilen bir müsteri kaydini silen Stored Procedure
CREATE PROCEDURE Musteri_DeleteById@Id int --parametreASBEGINSET NOCOUNT ON; DELETE from MUSTERI |
DECLARE @Id intSET @Id = 2EXEC dbo.Musteri_DeleteById @ID |
http://www.yazilimmutfagi.com/10257/veritabani/sql-server/sql-server-uzerinde-stored-procedure-kullanimi.aspx
16 Ekim 2015 Cuma
Asp.net MVC yapılmaması gerekenler
Yapmamız gerekenler
Controller -> Action içinde tek servisten verileri getirmeliyiz
İsimlendirme notasyonlarını düzgün yapmak gerekiyor. Daha sonra anlayabilmemiz için
Farklı katmanlar olması en azından c# için dll dosyalarını parçalamamızı sağlıyor. Ayrı ayrı build hata var mı diye kontrol edebiliriz.
Servis metotlarında ekleme işlemi, silme (bool), güncelleme işlemlerinde geriye nesnenin "id" değeri dönmesi gerekir.
Servis metotlarında kökten silme işlemlerinde geriye bool "true" veya "false" değerleri içeren bir nesne dönmesi lazım.
İç içe bağlılık gereken partiallar çağırılıyorsa bunlar Html.Action kullanmamız daha iyi olur çünkü partiallar arasında bağımlılığı azaltır. Sadece id'değeri yeter
PartialView'ler belli html etiketleri döndürüyorsa isimlendirmeyi ve dosyalamayı ona göre yapmalısın örneğin Views/Shared/FormElements/_Select.cshtml içine model olarak Model katmanından bir model eklemeliyiz.
Html.Partial'a içine model gitmeyen şeyler için yapılmalı
Yapmamamız gerekenler
Partial içinde partial çağırırken derinlik 1'i geçmemeli.
Class modellerinde iç içe gereklilik gerektiren başka classların kullanılmamalı.
Modellerde ortak tablo kullanma çabasına girmeye gerek yok. Her alanın tablosu ayrı olması hem okunabilirliği artıyor hem kod yazarken karmaşayı azaltıyor.
EF'de 1 veri gereken yerde [model].FirstOrDefault() yazıyorsak bir sıkıntı vardır, tablo ilişkisi çoktan çoka (many-to-many) değil, birden çoka(one-to-many) olması gerekiyor.
14 Ekim 2015 Çarşamba
30 Eylül 2015 Çarşamba
entity framework code first - birden fazla foreign key aynı tabloda ise
public class Team
{
    public int TeamId { get; set;}
    public string Name { get; set; }

    public virtual ICollection<Match> HomeMatches { get; set; }
    public virtual ICollection<Match> AwayMatches { get; set; }
}

public class Match
{
    public int MatchId { get; set; }

    public int HomeTeamId { get; set; }
    public int GuestTeamId { get; set; }

    public float HomePoints { get; set; }
    public float GuestPoints { get; set; }
    public DateTime Date { get; set; }

    public virtual Team HomeTeam { get; set; }
    public virtual Team GuestTeam { get; set; }
}


public class Context : DbContext
{
    ...

    protected override void OnModelCreating(DbModelBuilder modelBuilder)
    {
        modelBuilder.Entity<Match>()
                    .HasRequired(m => m.HomeTeam)
                    .WithMany(t => t.HomeMatches)
                    .HasForeignKey(m => m.HomeTeamId)
                    .WillCascadeOnDelete(false);

        modelBuilder.Entity<Match>()
                    .HasRequired(m => m.GuestTeam)
                    .WithMany(t => t.AwayMatches)
                    .HasForeignKey(m => m.GuestTeamId)
                    .WillCascadeOnDelete(false);
    }
}28 Eylül 2015 Pazartesi
JsonRequestBehavior.AllowGet
JsonRequestBehavior.AllowGet parametresi, parametre gönderimi iznini açar.
Yoksa geriye nesne döndüremezsin
2 Eylül 2015 Çarşamba
.Net Framework’te Timer Class’ları Arasındaki Farklar
.Net Framework’te Timer ismine sahip tam 3 tane class var;
Özellikle Multi-Threaded uygulamalarda tercih edilir. Thread-safe olduğu için, birden çok thread’den erişilebilir.
System.Threading.Timer
TimerCallBack delegate kullanarak, atanmış metodu çalıştırabilir. Metod, framework tarafından oluşturulan başka bir thread’de çalışır.
Timer nesnesi oluşturulduğu anda, çalışmaya başlar ve scope’tan çıkana kadar da çalışır. Durdurmak veya Başlatmak mümkün değildir.
Aşağıdaki örnekte 2.parametre (null), Callback method’a aktarılacak parametreyi gösterir.
3.parametre (1000), Timer nesnesi başlatılmadan önce beklenecek süreyi gösterir.
System.Windows.Forms.Timer
Toolbox’ta gördüğümüz nesnedir. Windows Form ile aynı thread’de ve senkron olarak çalışır, böylece hiçbir UI operasyonunu bölmez.
Daha ayrıntılı bilgi için MSDN’deki şu makaleyi okuyabilirsiniz.
- System.Timers.Timer
- System.Threading.Timer
- System.Windows.Forms.Timer
Özellikle Multi-Threaded uygulamalarda tercih edilir. Thread-safe olduğu için, birden çok thread’den erişilebilir.
| System.Timers.Timer t = new System.Timers.Timer(5000); |
| t.Elapsed += delegate(object _s, System.Timers.ElapsedEventArgs _e) |
| { |
| MessageBox.Show("5 saniye geçti!.."); |
| t.Stop(); |
| }; |
| t.Start(); |
TimerCallBack delegate kullanarak, atanmış metodu çalıştırabilir. Metod, framework tarafından oluşturulan başka bir thread’de çalışır.
Timer nesnesi oluşturulduğu anda, çalışmaya başlar ve scope’tan çıkana kadar da çalışır. Durdurmak veya Başlatmak mümkün değildir.
Aşağıdaki örnekte 2.parametre (null), Callback method’a aktarılacak parametreyi gösterir.
3.parametre (1000), Timer nesnesi başlatılmadan önce beklenecek süreyi gösterir.
| System.Threading.Timer t = new System.Threading.Timer(new System.Threading.TimerCallback(TimerTest), null, 1000, 5000); |
| private void TimerTest(object state) |
| { |
| MessageBox.Show("5 saniye geçti!.."); |
| } |
Toolbox’ta gördüğümüz nesnedir. Windows Form ile aynı thread’de ve senkron olarak çalışır, böylece hiçbir UI operasyonunu bölmez.
| System.Windows.Forms.Timer t = new System.Windows.Forms.Timer(); |
| t.Interval = 5000; |
| t.Start(); |
| t.Tick += delegate(object _s, EventArgs _e) |
| { |
| MessageBox.Show("5 saniye geçti!.."); |
t.Stop(); |
| }; |
C# Delegate Kullanımı
 Her ne kadar bazı programlama dilleri(Java) tarafından Delegate kullanımının
nesne yönelimli programlama paradigmasına aykırı olduğu savunulsada, C#
tarafından sahiplenilmekte ve kullanılmaktadır.
Her ne kadar bazı programlama dilleri(Java) tarafından Delegate kullanımının
nesne yönelimli programlama paradigmasına aykırı olduğu savunulsada, C#
tarafından sahiplenilmekte ve kullanılmaktadır. Peki delegate nedir ve neden kullanılır?
Delegate en basit anlamıyla metod referansıdır. Yani delegate metod referansını tutar.
Delegate tanımlanırken metodun geri dönüş değeri ve parametreleri belirlenir. Geri dönüş değerini void ve parametresiz tanımlamak da mümkündür. Kullanılacak metod, tanımlanmış olan delegate geri dönüş ve parametrelerine uygun olmalıdır.
Delegenin(delegate) başvurduğu bir metodu dinamik olarak değiştirebiliriz. Dolayısıyla bir delegeyi çağıran kod her çalıştığında farklı bir metod çalıştırabilir.
Delegate kullanılması metodları daha rahat kontrol etmemizi sağlayacak ve uygulamamızın performansını artıracaktır.
Bir örnek yapalım, markette satın alınan ürünler için fiş çıkaracaksınız. Satın alınan ürünün kaç tane olduğunu biliyorsunuz. Bu ürünler için hem KDV dahil hem de KDV hariç fiyatlarını göstereceksiniz. Bunun için iki ayrı metod tanımlayabilir ve bunları delegate yardımıyla kullanabilirsiniz. Örneğimizin kodları ve açıklamaları aşağıdaki gibi.
1
2
3
4
5
6
7
8
9
10
11
12
13
14
15
16
17
18
19
20
21
22
23
24
25
26
| //Hesaplama adında bir delegate tanımı yapıldı.//int tipinde bir parametre bekliyorpublic delegate decimal Hesaplama(int adet); static void Main(string[] args){ Hesaplama del = Fiyat; Console.WriteLine("KDV Hariç 5 Ürün"+ " Fiyatı: {0}", del(5)); del = KDVFiyat; //delegate değiştiriliyor Console.WriteLine("KDV Dahil 5 Ürün"+ " Fiyatı: {0}", del(5)); Console.ReadLine();}static decimal Fiyat(int sayi){ //Fiyat 10.5 kabul edilerek hesaplandı. (KDV Hariç) return sayi * 10.5m; }static decimal KDVFiyat(int sayi){ decimal kdvharicfiyat = sayi * 10.5m; //KDV %18 düşünüldü return kdvharicfiyat + kdvharicfiyat * 0.18m;} |
Aynı işlemi yapacağımız farklı bir kod yazımı daha yapalım. Burada delegate kullanımının daha etkili bir yöntemini göreceksiniz.
1
2
3
4
5
6
7
8
9
10
11
12
13
14
15
16
17
18
19
20
21
22
23
24
25
26
27
| public delegate decimal Hesaplama(int adet); static void Main(string[] args){ //istediğimiz sayıda ürün gönderebiliriz //Delegate tip, fonksiyon değişkenmiş gibi gönderilir Console.WriteLine(SonucHesapla(5, Fiyat)); Console.WriteLine(SonucHesapla(5, KDVFiyat)); Console.Read();}public static decimal SonucHesapla(int sayi, Hesaplama hesapla){ return hesapla(sayi);}static decimal Fiyat(int sayi){ //Fiyat 10.5 kabul edilerek hesaplandı. (KDV Hariç) return sayi * 10.5m;}static decimal KDVFiyat(int sayi){ decimal kdvharicfiyat = sayi * 10.5m; //KDV %18 düşünüldü return kdvharicfiyat + kdvharicfiyat * 0.18m;} |
26 Ağustos 2015 Çarşamba
Abstract Factory Method Tasarım Deseni
Factory Method tasarım deseni, nesne oluşturma ihtiyacı doğrultusunda
ortaya çıkmış bir tasarım desenidir. Bu tasarım deseni, oluşturulacak
somut nesnenin türünü belirlemeye gerek duymadan nesne oluşturma
işlemini temel almaktadır.
 Factory deseninin temel amacı nesne oluşturma karmaşıklığını
kullanıcıdan gizlemektir. Ayrıca kullanıcı, oluşturulacak nesnenin somut
türünü belirlemek zorunda değildir. Bunun yerine somut nesnenin
implemente edildiği soyut tür olan interface veya abstract class tipini bilmesi yeterlidir. Yani sorumluluk somut nesnelerden soyut nesnelere aktarılmaktadır. Genel olarak Factory sınıflar “static”
erişim belirleyicili bir metod barındırırlar. Bu metod, kullanıcıya
interface veya abstract class tipinde bir nesne döndürür. Bu sayede
kullanıcılar, alt sınıfların oluşturulması sorumluluğundan dolayı
oluşabilecek hatalardan da uzak tutulmuş olur.
Factory deseninin temel amacı nesne oluşturma karmaşıklığını
kullanıcıdan gizlemektir. Ayrıca kullanıcı, oluşturulacak nesnenin somut
türünü belirlemek zorunda değildir. Bunun yerine somut nesnenin
implemente edildiği soyut tür olan interface veya abstract class tipini bilmesi yeterlidir. Yani sorumluluk somut nesnelerden soyut nesnelere aktarılmaktadır. Genel olarak Factory sınıflar “static”
erişim belirleyicili bir metod barındırırlar. Bu metod, kullanıcıya
interface veya abstract class tipinde bir nesne döndürür. Bu sayede
kullanıcılar, alt sınıfların oluşturulması sorumluluğundan dolayı
oluşabilecek hatalardan da uzak tutulmuş olur.
Örnek Uygulama
Bu örnek uygulamamızda Grafik türüne göre Grafiğin temsilini yapan Sembollerin oluşturulmasını Factory Method yöntemiyle üretmeyi amaçlamaktayız.
Yukarıdaki şekildeki tasarım deseninin uygulanışını şu şeklide yapabiliriz.
 Gerçek bir uygulamadan alarak göstereceğim bu örnekte bir REST
servisinden gelen Graphic nesnesinin türüne göre sembol nesnesinin
belirlenmesi işlemini Factory Method inceleyeceğiz. Tabi bu örnekteki
konumuz Factory uygulaması olduğundan Servis işlemlerini temsili olarak
göreceğiz. Bizi ilgilendiren sadece nesne üretimi olduğundan nesne
üretim aşamasını inceleyeceğiz.
Gerçek bir uygulamadan alarak göstereceğim bu örnekte bir REST
servisinden gelen Graphic nesnesinin türüne göre sembol nesnesinin
belirlenmesi işlemini Factory Method inceleyeceğiz. Tabi bu örnekteki
konumuz Factory uygulaması olduğundan Servis işlemlerini temsili olarak
göreceğiz. Bizi ilgilendiren sadece nesne üretimi olduğundan nesne
üretim aşamasını inceleyeceğiz.
Bize servis tarafından sunulan Graphic nesnesi Null olarak gelmektedir. Biz yazılım tarafında Graphic nesnesinin türüne göre Sembolünü üretmekle sorumluyuz.
Symbol sınıfının soyut bir tip olduğunu görüyoruz. Graphic sınıfında da bu soyut tip kullanılmıştır.
Somut sembol sınıfları ise SimpleLineSymbol, SimpleFillSymbol, SimpleMarkerSymbol şeklinde oluşturulmuştur.
GraphicSymbolFactory sınıfına eklediğimiz GetSymbol metodu, Graphic türüne göre somut olan Symbol tiplerini oluşturmaktadır. Dikkat edecek olursak kullanıcıya soyut olan bir Symbol tipi vermekteyiz. Yani içerde olup bitenden kullanıcılar haberdar değildir.
GraphicService sınıfı içerisinde tanımlı GetGraphicsFromRESTService metodu, bir servis yardımıyla Graphic nesnesini elde etmektedir. Gelen Graphic nesnesinin sembolü ise kullanıcı tarafından Factory sınıfı yardımıyla belirlenir. Burada kullanıcı diye adlandırdığımız GraphicService sınıfıdır aslında. Çünkü API içerisinde hazırladığımız GraphicSymbolFactory tipini kullanan sınıftır. Kullanıcı sınıf aslında Symbol tipinden türetilen SimpleLineSymbol veya SimpleFillSymbol
gibi tiplerden haberdar değildir. Bu somut tipleri oluşturmak zorunda
da değildir. Bu karmaşık sorumluluğu Factory deseni ile bir sınıfa
aktarmış olduk.
Resim-1
Örnek Uygulama
Bu örnek uygulamamızda Grafik türüne göre Grafiğin temsilini yapan Sembollerin oluşturulmasını Factory Method yöntemiyle üretmeyi amaçlamaktayız.
Yukarıdaki şekildeki tasarım deseninin uygulanışını şu şeklide yapabiliriz.
Resim – 2
public class Graphic{ public Symbol Symbol { get; set; }} |
public abstract class Symbol{ public abstract void draw();} |
public class SimpleLineSymbol: Symbol{ public override void draw() { // Draw line }}public class SimpleFillSymbol: Symbol{ public override void draw() { // Draw polygon }}public class SimpleMarkerSymbol: Symbol{ public override void draw() { // Draw point }} |
public class GraphicSymbolFactory{ public static Symbol GetSymbol(Graphic graphic) { if(graphic is Point) return new SimpleMarkerSymbol(); if(graphic is Polygon) return new SimpleFillSymbol(); if(graphic is Polyline) return new SimpleLineSymbol(); throw new InvalidExpressionException("Unknown graphic type"); }} |
public class GraphicService{ private readonly IGraphicRestService service; public GraphicService(IGraphicRestService service) { this.service = service; } public Graphic GetGraphicsFromRESTService(string serviceUrl) { Graphic graphic = service.GetGraphic(serviceUrl); graphic.Symbol = GraphicSymbolFactory.GetSymbol(graphic); return graphic; }} |
18 Ağustos 2015 Salı
Jquery like gibi eleman seçme
<div name="falan[0].filan"> filan</div>
<div name="falan[1].falanca"> falanca</div>
<button id="sec">asd</button>
<script>
$('body').on('click', '#sec', function () {
alert($('[name*="falan"][name*="filan"]').attr('name'));
});
</script>
<div name="falan[1].falanca"> falanca</div>
<button id="sec">asd</button>
<script>
$('body').on('click', '#sec', function () {
alert($('[name*="falan"][name*="filan"]').attr('name'));
});
</script>
22 Temmuz 2015 Çarşamba
Reflection – Yansıma
Reflection, çalışma zamanında .NET assemblylerini, tiplerini ve tiplerin üyelerini dinamik olarak kullanma fırsatı veren yapıdır. Reflection namespace’i içerisinde bulunan tipler ile üyelere dinamik olarak erişme şansına sahibiz. Basit bir console uygulaması üzerinden örnek uygulama yapalım.
Öncelikle bilgi alacağımız tipi elde etmemiz gerekmektedir. Bunu 3 farklı yol ile yapabilmemiz mümkündür. Elde ettiğimiz tipi “Type” tipinden bir değişkende tutarız. Adından da belli olduğu gibi Type, tipin tipini tutan bir tiptir  bool tipine dinamik olarak erişerek içerisindeki üyelerin isimlerini öğrenmeye çalışalım.
using System.Reflection;namespace ReflectionKavrami{class Program{static void Main(string[] args){Type tip = typeof(Boolean);//Type tip = new Boolean().GetType();//Type tip = Type.GetType("System.Boolean");MemberInfo[] tipUyeleri = tip.GetMembers();Console.WriteLine("{0} tipi içerisinde {1} adet üye mevcuttur.", tip.Name, tipUyeleri.Length);int i = 1;foreach (MemberInfo member in tipUyeleri){Console.WriteLine("{0} - Üye adı : {1} , Üye tipi : {2}", i, member.Name, member.MemberType);i++;}}}}

Üyeleri elde etmek için kullandığımız GetMembers metodu, System namespace’I altındaki Type sınıfı içerisinde yer alan non-static bir metottur. Geriye dönüş tipi olan MemberInfo ise System.Reflection namespace’i altında yer alan bir tiptir.
Tüm üyeleri elde etmek yerine, ilgili tipe ait metotları, alanları, property’leri, event’leri, yapıcı metotları da elde etme şansına sahibiz. Type sınıfı içerisinde bu işlemleri yapan ilgili metotlar mevcuttur. Geri dönüş tipleri de System.Reflection isim uzayı altında tanımlı tiplerdir.
Projemize System.Windows.Forms kütüphanesini referans edelim ve Button sınıfı hakkındaki bazı bilgileri ekrana yazdıralım.
class Program{static void Main(string[] args){Type tip = new Button().GetType();Console.WriteLine("NameSpace : {0}", tip.Namespace);Console.WriteLine("FullName : {0}", tip.FullName);Console.WriteLine("Assembly : {0}", tip.Assembly.FullName);Console.WriteLine("BaseType : {0}", tip.BaseType);Console.WriteLine("is Class : {0}\n", tip.IsClass.ToString());Console.WriteLine("{0} tipi içerisinde tanımlı;", tip.Name);Console.WriteLine("\t{0} adet constructor metot,", tip.GetConstructors().Length);Console.WriteLine("\t{0} adet property,", tip.GetProperties().Length);Console.WriteLine("\t{0} adet metot,", tip.GetMethods().Length);Console.WriteLine("\t{0} adet event vardır", tip.GetEvents().Length);}}

Çalışma anında belirlenen bir tipin nesne örneğini oluşturmak isteyelim. Kullanıcıdan bir tip adı girmesini isteyelim ve bu tipten bir nesne örnekleyelim.
class Program{static void Main(string[] args){Console.WriteLine("Lütfen bir tip adı giriniz");string tipAdi = Console.ReadLine();Type tip = Type.GetType(tipAdi);object obj = Activator.CreateInstance(tip);Console.WriteLine(obj == null ? "Nesne oluşturulamadı." : "Nesne dinamik olarak örneklendi");}}


Son örneğimizde de .net framework içerisinde yer alan bir assembly’I elde edelim ve içerisindeki namespace’lere göre gruplama yapalım. Daha sonra da her bir namespace altındaki toplam tip sayısını ve bu tiplerin adlarını ekrana yazdıralım.
class Program{static void Main(string[] args){Assembly assembly =Assembly.LoadFile(@"C:\Windows\Microsoft.NET\Framework\v2.0.50727\System.Data.dll");foreach (var group in assembly.GetTypes().GroupBy(t => t.Namespace)){Console.WriteLine("{0}({1})", group.Key, group.Count().ToString());Console.WriteLine("*****************************");foreach (Type tip in group){Console.WriteLine(tip.Name);}Console.WriteLine();}}}

Kaydol:
Kayıtlar (Atom)